Friday, May 25, 2012

Typewriter Text to Your Computer: How to Get Good Results

Now that I've told you all where you can go to use decent OCR software, I will now cover how you can get good results with this software. These methods were discovered when cleaning up my own OCRed (look Mom, a made up word) chapters that I had written on my little S&C Skyriter. I wrote some of them while I was still trying to keep the spools from sticking when I first got it, so the text was a tad iffy. My later drafts look much better since my spools no longer stuck and I had gotten much better at typing on my machine. So here are a few things that you can try while writing with your own machines that can help you get good results when using OCR software.


  • Keep the draft clean. Since the OCR software reads the shape that it can see on the paper, it's best to try not and screw up and then fix it by backing over the word to cross it out. When in the flow, it's tempting to just hit the backspace or move the carriage so you can cross out the words with a handy ///, XXX, or even a horizontal line. This can be read in many strange ways, by the software, and it becomes tedious to go through and get rid of all the funny combinations. I suggest using white out tape to go over  your mistakes. I find it quite handy, and it keeps my manuscript clean for the software. Make sure you cover all of the mistake, or you may get the odd colon and period in the middle of a word.
  • Have crisp, clean letters. This is a little harder to achieve with a typewriter, so I suggest using any means necessary. You want the crispest, cleanest letters you can manage or you might get words that come out like this: ducL:. It was supposed to be duck,but the software didn't read it that way. My periods are also often mistaken for commas and my Is for ones. This is why I find it best to make sure that my letters come out as sharp as possible. Currently my letters are a tad gummed up, so I might get better results when I clean them. Using a typeface that is easy to read might help too. The g on my machine is a bit funny, so I get a lot of words that look like this: hugGed
  • Use a good quality scanner. This will also maintain the sharpness of your letters. I have a good one, so I don't have this problem. If you have an old one, invest in a new one, or borrow a friends. Many printers do double, triple, or quadruple duty these days, so a good scanner shouldn't be hard to come by.
  • If converting to a Word doc, try to spell everything right. I know that as writers we should try and do this anyway, but it doesn't always happen. By having good spelling, the amount of red and green squiggly lines should be reduced which makes fixing and finding the OCR errors much easier. 
I hope this helps for any writer who is crazy enough to write on a typewriter. I find that preventative measures make everything easier in life. 

For my first blog on using OCR software: Typewriter Text to Your Computer

Saturday, May 19, 2012

Typewriter Text to Your Computer

Hi, there. I know that it's been a while. It appears that I've been writing these things monthly. I guess my writing has kept me busier than I thought.


On that note, since I've been using a typewriter to do my rewrites, I've been looking for a way to convert scanned PDFs of my chapters into text. I noticed that Adobe had that option for roughly $20 a year and looked into it. Well, according to reviews that I searched for because I needed to know if they could convert text that had been typed out with a typewriter, I found that their PDF to Word conversions couldn't handle it. Why? Apparently their OCR software couldn't read the inconsistencies that come with typewriter text.


For those who don't know, OCR is the alphabet soup term for optical character recognition software. It's a program that reads the characters of a text and tries to turn it into the closest representation possible. From my research I discovered that most versions of the software aren't good enough to handle inconsistent characters well. None of them can handle handwriting. It was frustrating. Then I found this article that listed 10 softwares that have free options, five for online and five for desktop. It pretty much did the work for me.


I experimented a bit with the Google Docs option, but my PDF files were all too big. So decided to try the one that the article recommended: OnlineOCR. To say that this was a god send would be a little over the top because the free service can be a little limited. It only does 5 pages an hour for guest users. So, I suggest registering if you're going to use this service. They give you 20 credits (a credit per page) to start out and you can do PDF files, an option you don't have when a guest user. Additional credits can be purchased, or earned through their Bonus Program.


I took advantage of the 20 credits, and had one of my PDFs converted. It took a minute for the file to upload to the site, but then the conversion was relatively quick. (Although, this could depend on your internet speed, and your computer.) Even though it wasn't entirely accurate, OnlineOCR did a pretty good job. I'll still have to go through and fix the little problems like wrong letters, missing words, and formatting, but it beats transcribing my work. While not perfect, the service saved me quite a bit of time and effort that I can put back into my writing. (And gave me a good laugh. It's like reading auto-correct texts.)


So there you are. My first advice blog to the people who can't afford one of those fancy USB Typewriters or have the skills to do their own soldering. Or for those who have a monster collection of those clack-clack machines and still transcribe their own writing. I'm sure many of you have looked into such software, and been unhappy. So far, I have not been disappointed.


Now back to my novel.


Update: If you are a blogger, and are happy about the service that Online OCR provides, they will reward you credits for a blog review written by you. Just make sure you send them an email with the link, something not posted on the site that I had to discover by myself. It's worth it if you have a mound of pages. (Added 5/21/12)

Sunday, April 22, 2012

Spring, The Anathema of the Vampire: Me and EPP

It's that time of year again when temperatures start to rise and people begin to put away their winter gear. The showers go away and the flowers bloom revealing vibrant blossoms of crimson, pink, sunshine yellow, virgin whites, deep violets, and soft lavender. Spring is a glorious time when the temperature is not too hot or cold. It is the expectation before summer days laying by the pool. For everyone spring is wonderful.

Except me.

I know I said I would use this blog to talk about not only writing, but my life. It is time for me to relate a very important piece of this to those who read these words. I have a disease that dictates many aspects of my life. It is called erythropoietic protoporphyria, or EPP for short. With that giant question mark that just popped above your head, I now will attempt to explain what that is.

According to the American Porphyria Foundation's website:
Erythropoietic Protoporphyria is characterized by abnormally elevated levels of protoporphyrin IX in erythrocytes (red blood cells) and plasma (the fluid portion of circulating blood), and by sensitivity to visible light that is usually noticed in early childhood and occurs throughout life.
If you just made a face to go with that question mark, let me clarify. The protoporphyrin that has accumulated in every portion of my body that blood flows through is irradiated by long wave UV rays resulting in photosensitivity. This photosensitivity does not feel like a normal sunburn when you have been out swimming too long. It's more like holding your hand directly over the flame of a campfire, but not being able to pull it away. Or like getting hit with hot grease when cooking bacon. Or like a steam burn. Repeatedly stabbed by tiny needles works too. I've even heard the pain being compared to putting your hand on a hot stove and cuts filled with salt. To sum it up, the sunlight hurts.

Now, before any of you feel bad for me, I will come right out and say that I've been lucky. My case remained relatively mild until my sophomore year of college. I was able to wear tank tops and go swimming in my childhood and teen years unlike some children who have more severe cases of EPP. I've always known that I had it because I was diagnosed by my father, another with EPP, but I was formally diagnosed in June of last year. I was able to have a "normal" life, but perhaps that is why it is so hard for me now.

With the onset of spring this year in a new region of the US called central Cali, it has been especially difficult. Where before all I had to do was cover my arms and hands when outside, now I must cover my head and face. If I am "burned", light from my computer screen and those nifty florescent light bars they use in commercial buildings irritate the damage. Now I must wear gloves and sleeves when just getting online, and I can't take off my cardigan that I wear over my work shirt when it gets too warm at work because I am surrounded by brand, spanking new lights.

The ordeal has been frustrating with such gorgeous days. I am relegated to closed windows to limit the amount of exposure, something that is surprisingly hard on me. I never thought I would ever get this bad or feel this amount of pain. I never dreamed that I would have to plan my day around how much exposure I would get. I heard it said by a man with EPP in a video posted by the FDA that it was more like, "how much pain do you want to deal with that day." I think that is about as accurate as a person could get. When burned, I am tired and in pain. I feel the strong desire to tear off my skin, if it's especially bad, and often suffer from bouts of irritability. I feel like a wounded animal who just wants to limp away and find a  cool, dark place to recover. The one thing that doesn't happen to me is the outward signs of scabbing or discoloration. I swell a bit, but stay pale.

So, how do I deal? I suck it up. I use my weekends to stay inside and recover from any exposure that I've gotten. To limit my exposure to strong light, I have lowered the brightness on my computer. My typewriter is also getting a pretty good work out lately since I can't spend too long in front of the screen. I also keep my house cool to lessen the pain, much to the chagrin of my husband, but he deals with his favorite snuggie. (He wears it like a robe.)

As you can see, I'm managing but the mental implications have been more difficult to overcome. I know I'm trying to relay my experience, but there are some things that are still too personal for the internet. Besides, I'll feel like I'm whining if I haven't been already. My father has probably had it a lot harder than me, so I feel like I'm putting my foot in my mouth, but I do have one more thing to say:

Being in public is a strange experience when you're all covered up. People look at you with concern and skepticism. It's almost like they think I'm going to rob them, even if I'm driving in my own car sitting at a stop light. Once a lady gave me the most terrified look I have ever seen before she took a right. This is where I voice my confusion on societies fascination with vampires and the romanticism associated with them, and yet very little know about people with photosensitive disorders. When I tell people what I have, they look like they have found  Bigfoot. If they have already heard of or known someone with a porphyria, they often ask very polite questions about how I'm doing and are generally pleasant to talk to. Yet, I still have a conflict with what I like to call Vamp-fans. The popularity vampires have in our culture makes it easier to explain what I might be going through, but at the same time certain aspects of it baffle me to no end. To sum up this conflict, I shall relay a conversation I once had with my mom in a chinese restaurant. I believe it was triggered by a girl wearing a Team Edward shirt. (The following conversation may be paraphrased.)

Mom: I can understand why younger girls might like vampires, but I don't get the women who are in their thirties, or even my age, who are into it. I mean, I watch those things, Buffy and Angel, but I don't understand how obsessed they are with it.
Me: Mom, you married a vampire.
Mom: You're right, I did.

A fun revelation it was, but the best thing ever said was my husband: "Who ever thought being married to a vampire was romantic must have been on something."

There you have it, my short, half-assed explanation of what it's like for me these days with EPP. I could get more in depth, but I think I'll let the pros do it for me. Visit The American Porphyria Foundation for more on EPP, the innovations to treat it, and other forms of porphyria. For the best stories on the experience of living with it, the FDA interviews with two well spoken gentlemen and a doctor are worth viewing. They won't take much of your time and will help you fill your quota for Porphyria Awareness Week (April 22-28). I see that question mark again, so yes, that is a thing.

I'm going to go work on my book now.

Friday, March 16, 2012

It's Amazing How Much Time A Novel Sucks Up

For those of you who are kind enough to read my blog, I apologize for the lack of posts lately. I've been trying to get my novel extended before I go into major edits. My whole goal is to have it ready to be published by the end of the year due to pressure from family members and a couple friends.


To update: The beta response to my novel has been overall good. The major complaints mostly focus on a few story snags and grammar issues like comma placement. Apparently, I am not lacking in the creativity department. I have actually been complimented on my limited use of stereotypes. Most people give me thumbs up on character development and pacing despite a slow start.


As for the extensions, I have written chapters 21 through 23, and am currently working on my normal three rounds of edits before I submit them for critical eyes. I want to make sure that my additions are going to round out the story like my beta testers want or I may have to reassess my story. I doubt that will happen, but I like to plan for my worse case scenario. (For those who aren't familiar, I'm tacking on another 12 chapters to the original 20.)


And my typewriter purchase. So far I can get it to function pretty well. I probably needs cleaned. I'm happy with my baby. I would post up an example of what I've typed out with it, but I'm having troubles getting my computer to recognize that my printer also has a scan function. For know I only have pictures of what it looks like. I introduce my new Smith & Corona Skyriter.


Such a nice little machine. It's only about the size of a 2 inch binder.

The guts. For now I'm trying to fix all the sticking issues the left spool has. 


So, as those who are nice enough to read this can see, it's a nice little machine with only a few problems. I'm glad I fought that other bidder on ebay for it. Paid more than I wanted to, but probably better than some of the others people wanted more for.


Now back to my edits.

Saturday, January 28, 2012

How to Bind Your Own Book

This project came into mind when my mom kept nagging me that she wanted to read my own work. So, not knowing what I was getting into, I decided to bind a copy of my work together, by hand, to give to her as a gift  for Christmas after I had finished writing my book. As I worked on this project, I chronicled my adventure because it would make an awesome blog entry. After much lip flapping, here it is:

First, I had to collect all of the separate Word documents into a single one, and then put it into book format with five pages to a booklet. To say this was the most difficult part of the project would be a lie, but it did induce much screaming and banging on things. After fixing multiple formating errors, and after checking to see that I had sufficient ink and paper stock, I was ready to begin. 

I should note that a printer that prints double sided is a must. I have a nifty HP Photosmart Premium C410 series that does the job nicely. (Here is where I thank my parents for the pricy not-so-little machine that made my desk wobble every time it spat out my work like it was about to take off for space. [It has since been moved.] It is my favorite little office assistant even though it is expensive to feed.)

Here is the finished product:

My stack of freshly printed pages. What a pain to sort.
After printing I double checked for errors. The only problem is that you have to print off the whole batch. You can't go back and reprint single pages if something flubbed. It did pretty good, except the page numbers were on the inside margin of the page and not the outside. Oh well. Word didn't exactly let me see what the whole format for a book page would look like, a flaw they should fix. (As another note, I have Office 2010, so I'm not going to give directions since I don't know how earlier versions set up this format.)

Since the batch prints out at once, I had to go through and divide out the 5 page booklets and fold them.

The first five pages folded and ready for reading. 13 more to go.

This is why you need page numbers. Without them,  you're screwed.

Done. That was that was the easy part.
Now it was time for me to gather the rest of the supplies.

My folded pages, ruler, scissors, box cutter, pencil, packing tape, needle, thread, cardboard from my garage, and paper bags from the grocery store.

The only purchase I made. The whole thing cost me $1.99.
Once I had done that, I could get started on the assembly of the actual book. The first step: sew together each booklet so the pages don't come apart. (I know it seems like common sense, but I can see people forgetting this.)

This is where I discovered that I had to loop the thread around the end of the page and tie it to itself so it didn't slip through. I was impressed at how straight I could make it.
First booklet done. Now 13 more to do.

Back view, and I tell you, this was not coming apart no matter how hard I pulled.
The finished product, so far. My stitches were so neat I almost didn't want to cover them up.
This work was tedious. I ended up with a finger and thumb so sore using the remote control hurt. I had to stop every few booklets to recover. It was moments like this I wished I had a thimble, or a sewing machine. The worst part, tying 28 little knots. (To think I might do this again after the work I'm doing on Hands of Ash now.)

I did notice a slight problem after I had sewn all the pages together. The margins didn't look right. It was time for some trimming.

Cut on cardboard or you'll screw up your table. We wouldn't want that now, would we?

I used a box cutter to trim off half an inch because I was too broke to afford an exacto-knife. It looks so much better now.

Cover time. Using the cardboard I didn't trim my pages on, I measured out a 1 x 9 in spine, and two 5 x 9 inch covers.

Wha-la! Aren't they lovely.
After cutting out the pieces, I tested to make sure that my pages fit. The edge of the cardboard should hang over all the edges of the paper when moved in about a fourth of an inch from the fold. Then I laid them out and used the packing tape to tape them together, leaving about a fourth of an inch between the pieces. Use the tape only on the inside. (I tried doing the outside too, it didn't really work.)

Those spaces are important. I swear.
See, I said they were important.
Here is where my $1.99 came in. (All purpose white glue is perfect for the rest of this project.) I glued down one of the covers to one side of the grocery bag that I cut away from the rest of the panels to get one smooth piece of paper. Then I trimmed the bag so that it would fit around the edges of the cover.

Make sure the sections to be folded over are big enough to do so. Too small, and everything will just peel apart.
I had to improvise for the spine to make sure that everything was covered. A lot of this was guess work. Successful guess work.
Now you see everything take shape.
Remember those little spaces? Make sure to tuck the bag into them to make a little indentation. This will help strengthen the fold. Let the cover dry before you move on to the spine and so forth or else the book will fall apart and you'll have to start all over again.

After everything had dried, I added those colorful pages that line the book covers on the inside. The problem I had was that I had left all my scrapbook paper that I use for origami at my previous residency, and so used some pretty underwater paper with whales that had nothing to do with my story in anyway.

I folded it over to see how much I had to trim off, leaving the spine exposed.
Then I glued it down. See how good that looks.
Both sides done.
I don't have pictures for the next part, bear with me. It had to be done pretty fast.

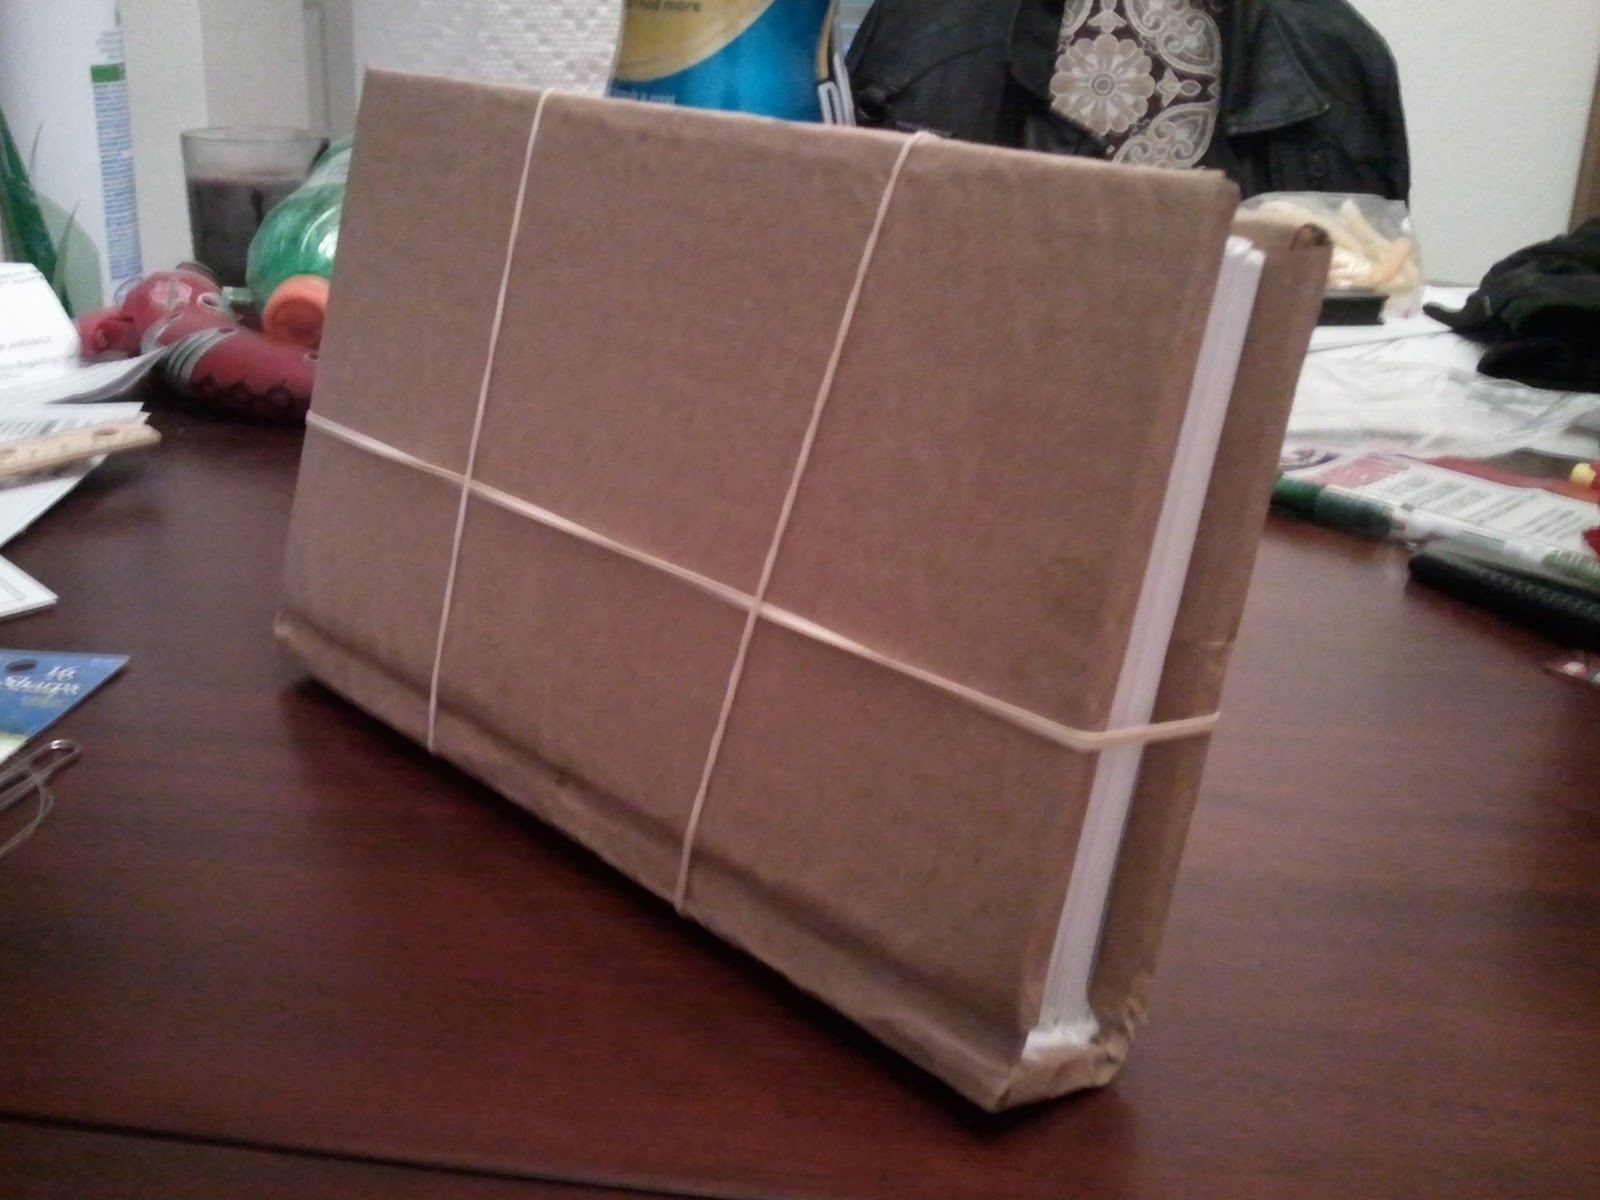
I took the glue and put it all over the inside of the spine. Holding my pages together so that they were even, I pressed the folds down onto the spine and lifted the covers up to sandwich the pages in. I evened out any pages that had gone rebellious on me as I applied pressure to the spine and cover to make sure that the glue set. After making sure that everything was straight, I dug around for 3 rubber bands while I clutched my fragile project.

I left it this way for a few hours. Better safe than sorry.
After wrapping the rubber bands around the book, I added some glue on the spine at the edge of the pages. When done, it turned out this way:


Those lovely stitches.
Power outage = no title on the cover.
So glad the spine held together.
This is were I gloat and say what a damn good job I did. I didn't use a youtube video, or another person's blog. I did this all from memory. I cannot say how happy I was to do such an awesome job on this project, especially with the power outage that happened around the same time. My mother loved it. She even made me sign it.

I know that this blog probably isn't as helpful about binding your own book as another source, but whatever. Don't kill my happy.